I had a bunch of pallets and I thought they would make great wood to make an old-looking coffin. Here is what DH and I have gotten done so far. It will eventually be a MIB pneumatic. When I get to that stage I will start another thread. OK, here goes my first tutorial:Please note: Check with your local cemetery to see if they will accept a self-made coffin, and if there are any material / dimension / other requirements.
To make this I used 4 pallets (2 small and 2 large) to give me enough wood for the top and sides. I used a sheet of plywood for the bottom and a box of 1 inch dry wall screws (coarse thread) and 3 (6 foot by 6 inch) fence posts. I used a drill, marker, angle saw, reciprocating saw, and circular saw (also my jig when the battery on the circular saw died.)
Use a reciprocating saw to cut off the nails from the pallets to separate the boards.
Lay out the best narley pieces of wood to make your lid. Mine is 6 feet long and 27 inches at the widest point.
To make three cross braces (top center and bottom): Take a 6 foot, by 6 inch fence post ($1.50 at Lowes) and cut down the center to give you two 3 inch fence posts. Now measure the top, bottom and center of the lid and give yourself a 2 inch clearance on each side. Cut three braces (one each for top, middle and sides) with saw.
At the top, bottom and middle: slide a section of the fence post underneath. Leave a 2 inch space from all sides.
Pre-drill holes (2 for each board) and screw in 1 inch drywall screws.
Flip over and add another cross brace for stability.
You will now mark the outline of the toe-pincher. For the bottom angle: Take a long board and starting 16 inches from the top and 3 inches from the edge of the bottom, mark a straight line. Repeat for the other side. For the top angle: start at that same 16 inch mark and 3 inches from the edge of the top side, make a mark. Repeat for the other side.
Now cut off to form the shape of your coffin.
You must make sure that the braces give you enough clearance for the sides when you close it. If too long, cut off with a saw.
Lid nearly done but not nearly scary enough…
Pre-drill and screw in accent boards to give it a creepier look. They also firm up the boards if you screw in each board to the accent piece.
Cut off edge of accent boards with saw.
Top is done!!!!
For the bottom of the coffin, there is no need to use pallet wood. Plywood is fine. Place top of lid on the plywood and trace out. Be sure to swing one side of the top lid to the edge of the plywood so it saves you from not having to cut out one of the sides.
Here you can see the pattern made.
Bottom and top complete. OK, on to the coffin build:
First, decide how deep you want your coffin. To me, 12 inches is too shallow and 18 inches is too deep. I settled on 15 inches.
Now determine which pieces of pallet wood would work for the header, footer, two sides and two angle sides. Pick evil-looking wood for best effect. The wood sitting at the foot of the coffin is long enough to make the header and footer when I cut it in half.
Lay out the side wood to get ready to screw together using the plywood bottom as a working table. Make sure that you have enough wood to make the sides at least 14 inches deep. (1/2 inch bottom plus 1/2 lid plus 14 inches equals 15 inch deep coffin.)
To make the needed cross braces: Using the remaining fence board wood from the lid construction that was cut in half (3 inch wide piece) and cut off twelve 12 inch long pieces. If you don’t have enough wood, grab another fence post cut in half lengthwise and continue to cut your needed pieces. Grab another fence post (6 inch wide) and cut off two 12-inch pieces.
Using the same procedure you used to make the lid, pre-drill and screw in the side boards into the cross braces. First use the 3 inch wide cross brace for each set of pallet wood and then use the 6 inch wide cross brace to join the two sets together. Be sure to have the cross brace level with the bottom of the side. There will be a large gap left at the top. This will allow the lid to clear when closed.
Here’s how the side looks when held up on the bottom. Mark where the side of the coffin angles away to the header. You will be cutting the excess of the side off.
Using a square, mark off the needed amount. Cut off with a circular saw.
Sides are done. Make the top angle sides and the header and footer but do not cut to the proper fit. You will do that later on.
Using the thick wood from the center spine of the pallet wood, cut off 3 to 5 inch pieces of wood. You will need 8 pieces total.
While side is held up in place, slide up one of the pieces of wood you just cut. That will serve as the anchor for the side. Mark the placement with a Sharpie. Put side back down on floor.
Pre-drill and screw in 1 3/4 ” screws in three places on the wood anchor. Use two wood anchors for the one side. Repeat process to attach the other side to the bottom.
Pre-drill and screw in 1 3/4″ screws into the wood anchor. Do a total of three screws for each anchor.
Measure the opening at the footing between the two sides. Using your square, measure that on the footer/header piece and cut the footer out with a circular saw.
Again, mark where a wood anchor is needed for the footer, pre-drill and screw in. Then, attach the footer to the wood anchor. You can see that I also had a space open for my wiring to go through for the MIB I will be making the coffin into.
Pre-drill and screw in each side into the footer. I screwed in each board to make it very solid.
Now for the angle sides. Measure the distance from the end of the side to the header. Using your square, mark off and cut the side to fit. Mark, pre-drill and screw in anchor wood and attach the angle side.
To add strength, use another cross wood to span the side and the angle side together. Pre-drill and screw in from the other side.
Screw in each board to cross wood.
Follow same procedure for the footer to attach the header. All the sides are on!
As you can see, there are cross braces everywhere! I hope you remembered to leave a 2 inch clearance at the top or the lid won’t fit on.
Now to make the top even: I put the lid on to show that we will have to saw the top edges to achieve this.
Measuring from the bottom plywood, mark the perimeter of the coffin 14 1/2 inches high. Cut this out with the circular saw.
Cut is done and pretty even.
To add rigidity, pre-drill and screw in 1 3/4 screws from the bottom up to the cross pieces in the inside. Do that for each one. Also, go around and screw in all loose boards until you feel comfortable that it is strong. I did this because this will end up being a MIB and will take punishment from pneumatics.
Lid fits nicely. Now it needs an accent piece on both sides. Again screw the accent piece to each board to make it much more rigid.
Now with accent piece. Much scarier. In part III I will add hinges and rope handles and call the coffin build DONE!
DIY Pallet Coffin Tutorial
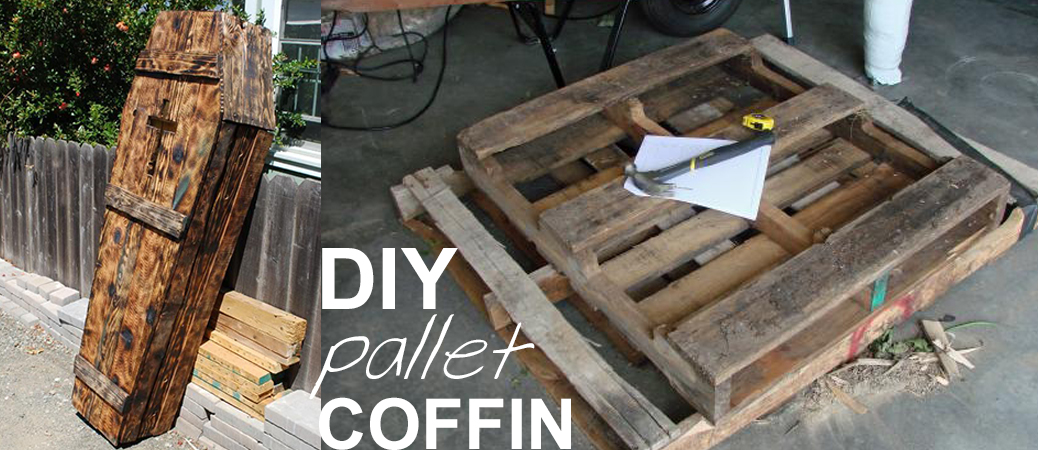
Are you the hands on, do-it-yourself, crafty, independant type? Can’t get over the $$$ price tags at the funeral home? Pallets seem to be the best friend of the DIY crowd, and we ran across this tutorial for a DIY pallet coffin.
Please note: Check with your local cemetery to see if they will accept a self-made coffin, and if there are any material / dimension / other requirements.
From Terra at HalloweenForum.com:
I don’t think that I would have ever thought to take a pallet and turn it into a coffin, but I think that it would be perfect to do for Halloween next month. As you suggest using, I do have two pallets at my disposal that I could use for a project like this. However, I will probably want to stain the wood, put a smoke machine inside of it, and jump out of it to scare the neighborhood kids.